Connecting to Postgres with Java using JDBC
In this guide, we will study the step-by-step procedure to establish a connection to the Postgres database with your Java project. We will take advantage of the JDBC (Java Database Connectivity) driver to setup the connection, and then will take a look at different approaches to integrate the JDBC driver into your project.
Let's get started.
Step 1 - Integrate the PostgreSQL JDBC driver into your project directory. We can add the JDBC driver either by manually adding the JAR file in the project or using a management tool like Maven.
1. Using PostgreSQL JDBC Driver
1.1 - Download the PostgreSQL JDBC Driver in your Device. Visit their official website to download it.
PostgreSQL JDBC Driver is driver that allows the users to connect a Java program to a PostgreSQL database. It is an Open-source driver. To learn more about it, check there official documentation.
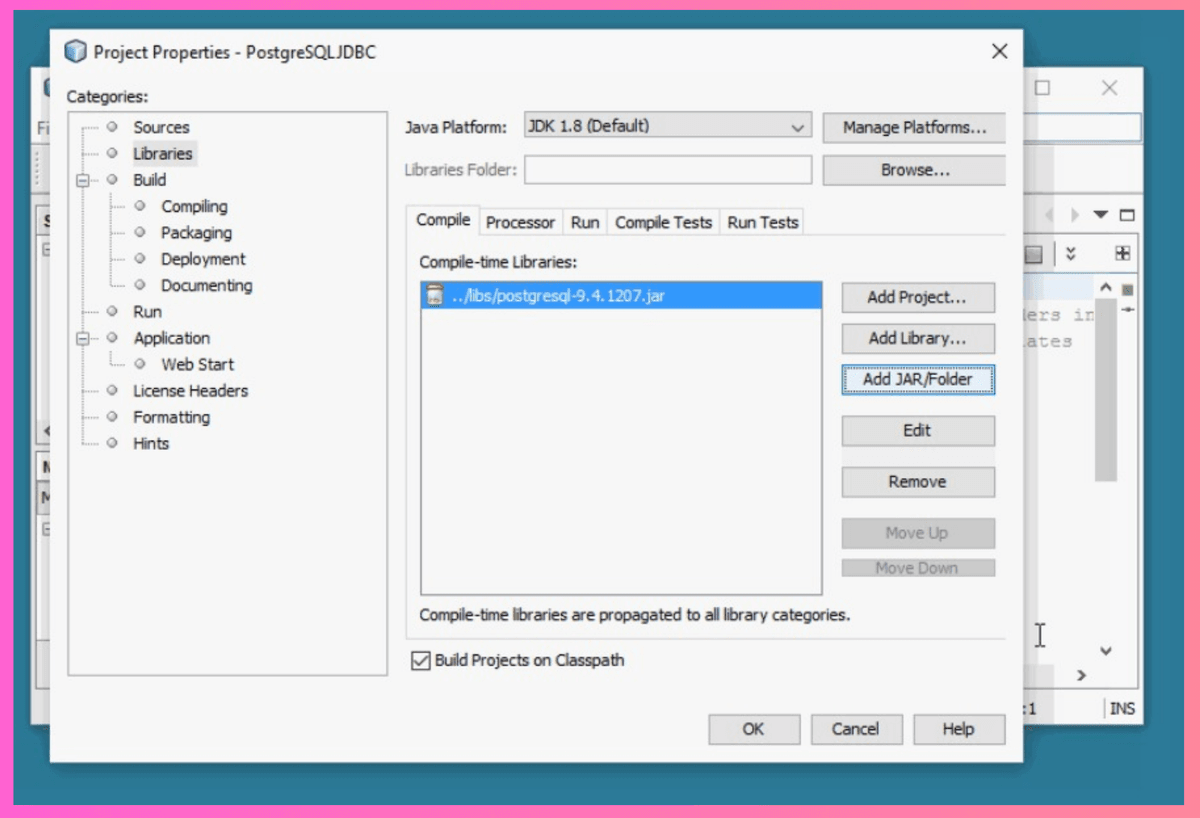
1.2 - Add the PostgreSQL JDBC Driver JAR file to your project.
To do that go to Project Properties → Add JAR/Folder and select the downloaded JDBC driver file.
2. Using Maven
2.1 - In this method, we need to modify the pom.xml file of our project. This XML file holds all the necessary information like dependencies, metadata, and build settings required to build and manage the project.
Open the pom.xml file in your project directory and integrate the PostgreSQL JDBC driver. To do that, simply paste the following code snippet in pom.xml file.
<dependencies>
    <!-- Other dependencies -->
    <dependency>
        <groupId>org.postgresql</groupId>
        <artifactId>postgresql</artifactId>
        <version>DRIVER_VERSION</version>
    </dependency>
</dependencies>
Do replace the DRIVER_VERSION with your PostgreSQL JDBC driver.
You can check the official documentation of Postgres JDBC to get the driver version.
Maven, primarily for Java projects, streamlines the entire development process, ensuring consistency in managing dependencies, code compilation, testing, packaging, and deployment across different environments.
Check their official documentation to learn more about it.
You do not need to manually download the JDBC Driver when you are using Maven method. Maven takes care of that by automatically downloading all the required JAR files from remote repositories.
Step 3 - Connect the PostgreSQL database to your project. Use this code to connect the database:
import java.sql.Connection;
import java.sql.DriverManager;
import java.sql.SQLException;

public class PostgreSQLExample {
    public static void main(String[] args) {

        String jdbcUrl = "jdbc:postgresql://localhost:5432/database_name";
        String username = "username";
        String password = "password";
        Connection connection = null;

        try {
            // Register the PostgreSQL driver
            Class.forName("org.postgresql.Driver");

            // Connect to the database
            connection = DriverManager.getConnection(jdbcUrl, username, password);

            // Perform desired database operations
            System.out.println("Successfully connected to the database");

        } catch (ClassNotFoundException e) {
            System.err.println("PostgreSQL JDBC driver not found: " + e.getMessage());
        } catch (SQLException e) {
            System.err.println("Connection to database failed: " + e.getMessage());
        } finally {
            // Close the connection
            if (connection != null) {
                try {
                    connection.close();
                    System.out.println("Database connection closed");
                } catch (SQLException e) {
                    System.err.println("Error closing connection: " + e.getMessage());
                }
            }
        }
    }
}
Make sure to replace the username, password, and database_name with the credentials of your database.
Step 4 - Now you can execute your desired SQL queries to perform operations on database.
try (Connection connection = DriverManager.getConnection(jdbcUrl, username, password);
     Statement statement = connection.createStatement();
     ResultSet resultSet = statement.executeQuery("SELECT * FROM employees")) {

    while (resultSet.next()) {
        String columnValue = resultSet.getString("column_name");
        System.out.println("Column Value: " + columnValue);
    }
} catch (SQLException e) {
    System.err.println("Database query error: " + e.getMessage());
}
Use your table name in-place of employees.
Step 5 - Close the connection after you have performed the desired operations on the database.
// With try-with-resources (shown above), resources are automatically closed
// No need for explicit close statements, which is safer and prevents resource leaks
// The following code is only needed if you're not using try-with-resources:

try {
    if (resultSet != null) resultSet.close();
    if (statement != null) statement.close();
    if (connection != null) connection.close();
} catch (SQLException e) {
    System.err.println("Error closing database resources: " + e.getMessage());
}
In this example, we have demonstrated how you can read the data, but you can also perform DML operations on Posgtres like Insert and Update, and DDL operations like Create Table.
Insert
try (Connection connection = DriverManager.getConnection(jdbcUrl, username, password)) {
    String sql = "INSERT INTO employees(column1, column2) VALUES (?, ?)";
    try (PreparedStatement preparedStatement = connection.prepareStatement(sql)) {
        preparedStatement.setString(1, "value1");
        preparedStatement.setString(2, "value2");

        int rowsInserted = preparedStatement.executeUpdate();
        System.out.println(rowsInserted + " row(s) inserted.");
    }
} catch (SQLException e) {
    System.err.println("Error inserting data: " + e.getMessage());
}
Update
try (Connection connection = DriverManager.getConnection(jdbcUrl, username, password)) {
    String sql = "UPDATE employees SET column1 = ? WHERE column2 = ?";
    try (PreparedStatement preparedStatement = connection.prepareStatement(sql)) {
        preparedStatement.setString(1, "updated_value");
        preparedStatement.setString(2, "old_value");

        int rowsUpdated = preparedStatement.executeUpdate();
        System.out.println(rowsUpdated + " row(s) updated.");
    }
} catch (SQLException e) {
    System.err.println("Error updating data: " + e.getMessage());
}
Create Table
try (Connection connection = DriverManager.getConnection(jdbcUrl, username, password);
     Statement statement = connection.createStatement()) {

    String createTableSQL = "CREATE TABLE employees ("
            + "id serial PRIMARY KEY,"
            + "name VARCHAR(255),"
            + "age INT)";

    statement.execute(createTableSQL);

    System.out.println("Table created successfully.");
} catch (SQLException e) {
    System.err.println("Error creating table: " + e.getMessage());
}
Conclusion
In this guide, we discussed the step-by-step process to connect to the Postgres database with Java.
Working on a C# project? Explore our C# guide to learn how to establish a connection with a PostgreSQL database using C#.
Also, check out our new extensions pgmq and pg_later which can help you manage basic message and long-running query operations.